Move-In Checklist.
Key Exchange.
A clean, three-page editable PDF template for documenting the unit's condition room-by-room and recording every key, fob, and remote handed over on move-in day. Fill it out on your computer — no printing required. Protects your deposit, your tenancy, and your peace of mind from day one.
This checklist is provided for informational purposes only. TheRentalMarket.ca and its representatives assume no liability for the use, accuracy, or outcome of this document. For specific legal questions, consult a qualified real estate or legal professional.
Ontario doesn't legally require a written move-in inspection — but if a dispute about damage, deposits, or unit condition ever lands at the Landlord and Tenant Board (LTB), the side with a signed, dated, photo-supported checklist almost always wins.
Without one, it's your word against your landlord's. With one, the unit's condition on day one is locked in writing and bound by both signatures.
This template covers the three things every move-in record needs: tenant and unit details, a complete inventory of every key and access item handed over (with the key deposit recorded), and a room-by-room condition log with space for defect photos.
Page 3 includes a sign-off block for both parties — plus your agent if you're working with one — so the entire move-in is documented in a single PDF.
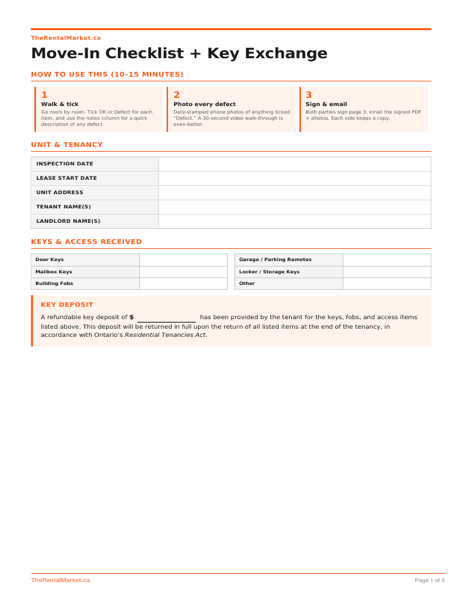
How to Use It (10–15 minutes)
The cover page opens with a 3-step quick guide: walk & tick each item OK or Defect, photograph every defect (a 30-second video walk-through is even better), then sign & email the PDF with the photos to all parties. Each side keeps a copy.
Tip: Do the inspection before you start moving boxes in. Once your stuff is in the unit, it's much harder to spot pre-existing wall scuffs, floor scratches, or appliance issues.
Unit & Tenancy Details
Captures the inspection date, lease start date, full unit address, and the legal names of all tenants and landlord(s). These should match exactly what's on your signed lease (Form 2229E).
Important: If you're renting with roommates, every tenant on the lease should be named here. Anyone not named has no tenancy rights and isn't a party to this record.
Keys & Access Received
A line-by-line inventory of every door key, mailbox key, building fob, garage / parking remote, locker / storage key, and any other access item handed over. Record the count of each.
Why this matters: When you move out, the landlord can withhold a refundable key deposit only for items not returned. If you don't document what you received, you can't prove what was returned. Take a photo of all keys laid out before you sign.
Key Deposit
Records the refundable key deposit amount you paid. Under Ontario's RTA, key deposits are legal only at the actual replacement cost of the keys, fobs, and remotes — and must be fully refunded when items are returned at the end of the tenancy.
Watch for: Inflated key deposits (several hundred dollars for a single fob is suspicious), or deposits that aren't labelled “refundable.” Anything beyond replacement cost is an illegal deposit under the RTA.
Room-by-Room Walk-Through
Page 2 covers nine common areas: entryway / living / dining, kitchen (incl. appliances), up to three bedrooms, up to two bathrooms, laundry / storage, and outdoor space (balcony, patio, or yard). For each room, tick OK or Defect against five items: walls / ceilings, floors, windows + doors, fixtures + outlets, and other (smoke / CO detectors, vents, etc.).
Rule of thumb: If you're unsure, mark it as a defect and add a quick note + photo. It costs nothing to over-document, and it's the best protection against deposit-return surprises later.
Building Contacts
Page 3 captures key contacts you'll need throughout the tenancy: superintendent name and phone, property manager name and phone, and the emergency / after-hours number. Fill these out on day one so they're saved if a pipe bursts at 11pm.
Additional Notes
An open block for anything that doesn't fit the room grid: items the landlord agreed to fix before move-in but hasn't yet, appliances included with the unit, special arrangements about parking or storage, or anything else worth recording.
Tip: Use this space to confirm verbal promises in writing. “Landlord agreed to replace stove before May 1” is far stronger as a signed note than as a remembered conversation.
Sign-Off
Both tenants and landlord(s) sign and date the form, with space for an agent or representative signature if applicable. The sign-off explicitly confirms the checklist accurately reflects the unit's condition and that all keys listed on page 1 were transferred.
Important: The sign-off does not waive or modify either party's rights or obligations under the RTA — it's purely a record of fact.
For a deeper breakdown of your protections under the RTA — deposits, repairs, evictions, and more — see our Ontario Tenant Rights guide. Pair this checklist with the Ontario Standard Lease (Form 2229E) for a complete move-in package.
No — Ontario does not legally require a written move-in inspection (unlike some other provinces). But the Residential Tenancies Act still puts the burden on the landlord to prove damage was caused by the tenant beyond ordinary wear and tear. A signed, dated, photo-supported checklist is the single best evidence either side has if there’s a dispute about the unit’s condition at move-in. Skipping it is one of the most common ways tenants lose deposit interest, get charged for pre-existing damage, or end up at the LTB without records.
The lease is the legal contract that governs the tenancy. The move-in checklist is a condition record attached to (but separate from) the lease. The lease says you agreed to rent the unit; the checklist documents exactly what condition it was in when you moved in. Both should be signed and dated by both parties, and both should be kept on file for the entire tenancy.
Yes — but only at the actual replacement cost of the keys, fobs, or remotes being handed over. Landlords cannot collect a key “deposit” that exceeds replacement cost, and the deposit must be fully refunded when the keys are returned at the end of the tenancy. Anything beyond replacement cost is treated as an illegal deposit under the RTA. Always record the deposit amount and the items it covers in writing — that’s exactly what the Keys & Access section of this checklist is for.
You can still complete the checklist on your own. Walk through the unit on your move-in day with your phone, take date-stamped photos and a 30-second video of every room (especially anything damaged or worn), fill out the checklist, and email a signed PDF to the landlord with the photos attached. Ask them to acknowledge receipt in writing. If they later try to charge you for pre-existing damage, you have the timestamped record. This is exactly what we do for every tenant we represent.
For the entire length of your tenancy plus at least two years after move-out. Disputes about deposit returns, damage charges, or last-month’s-rent interest can surface months after you leave. Keep a digital copy in cloud storage and a paper copy with your lease. If you ever end up at the Landlord and Tenant Board, the signed checklist + photos is often the deciding evidence.